

She enjoys all aspects of home DIY- from simple crafts to complete home remodels.
- Clay Moon Phase Wall Hanging - July 4, 2023
- What To Do When a Toddler Won’t Keep Their Blanket On - June 10, 2023
- How Do Child Locks Work in Cars? (And When To Use Them!) - June 10, 2023
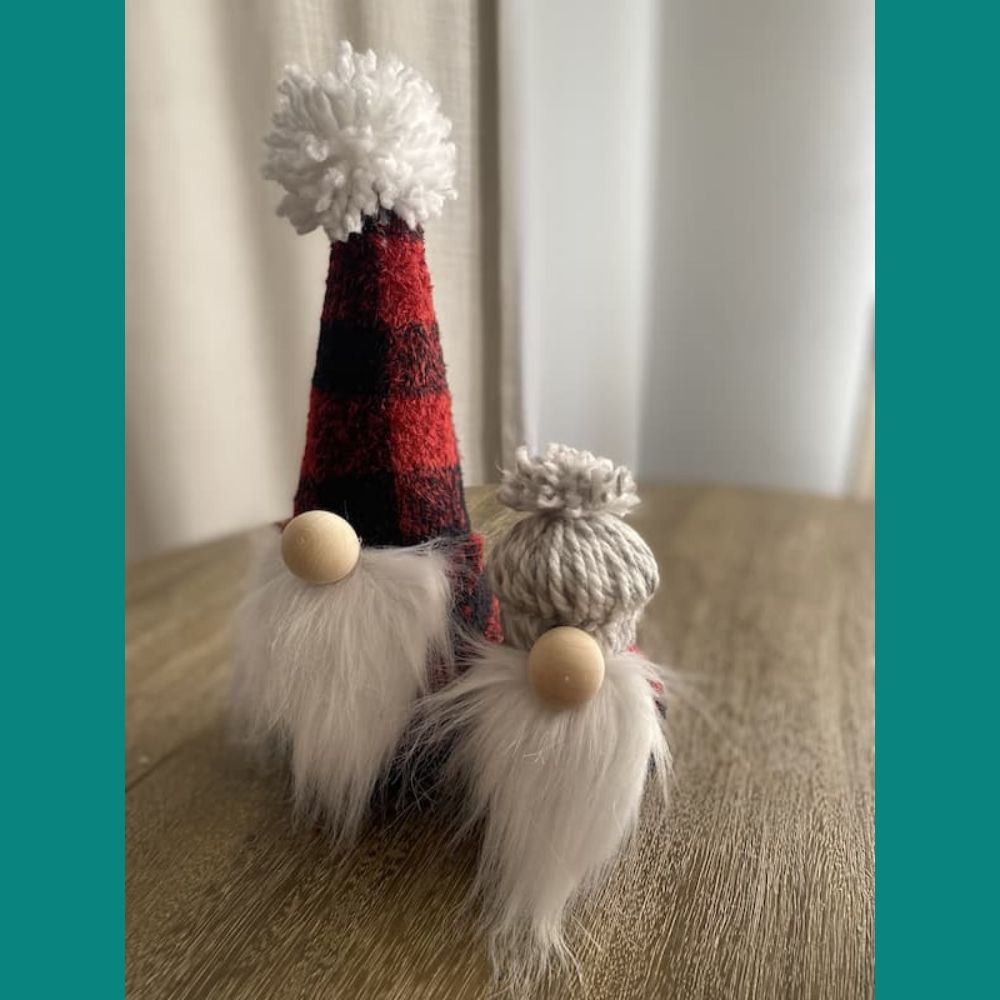
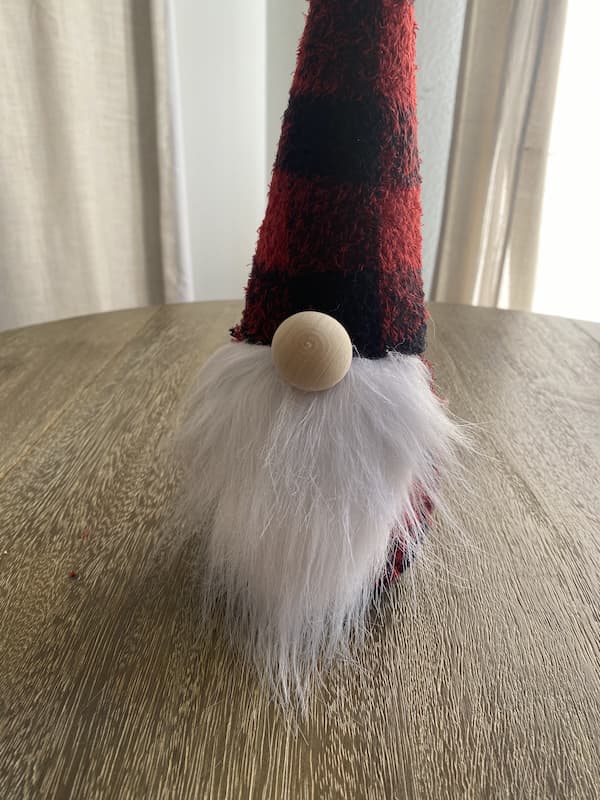
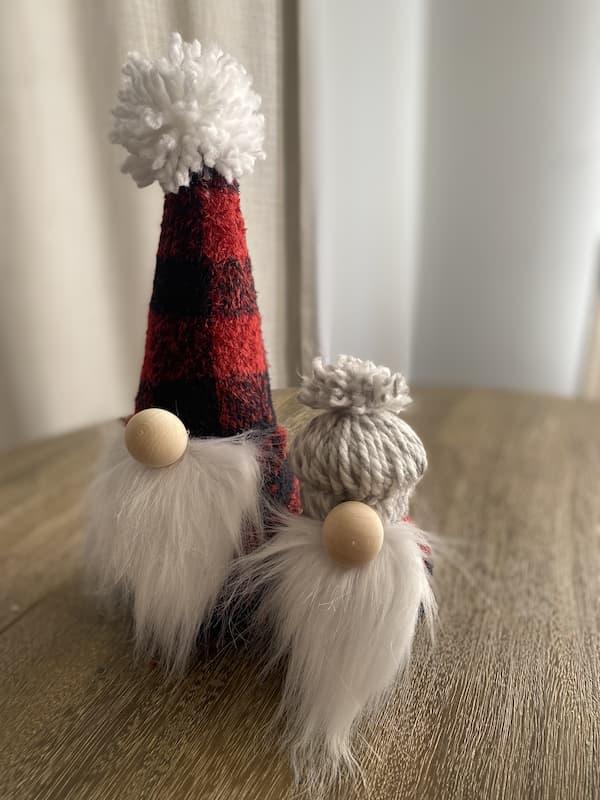
Here’s a fun and simple DIY craft project that you are going to love. Whether you are crafting for the holidays on your own or with your family, these Christmas-themed sock gnomes are a lot of fun to make.
With their big round noses and cute, fuzzy beards, these whimsical creatures are perfect for perching atop any surface to give it a little holiday cheer.
In this article, I will teach you how to make your very own Christmas gnomes using socks!

Supplies Needed:
- A hot glue gun
- Holiday-patterned socks
- Plain ankle socks (we bought white, but after making them, we recommend gray)
- Beans, rice, or something else to stuff the socks with (needs to be heavy enough to hold up on its own)
- Wooden doll heads or wooden beads
- Rubber bands
- A styrofoam cone
- Faux crafting fur
- Scissors
- A pencil
- Yarn of various colors (if you want to buy pom poms and only make a cone hat, yarn is optional)
- A paper towel or toilet paper roll
Step 1
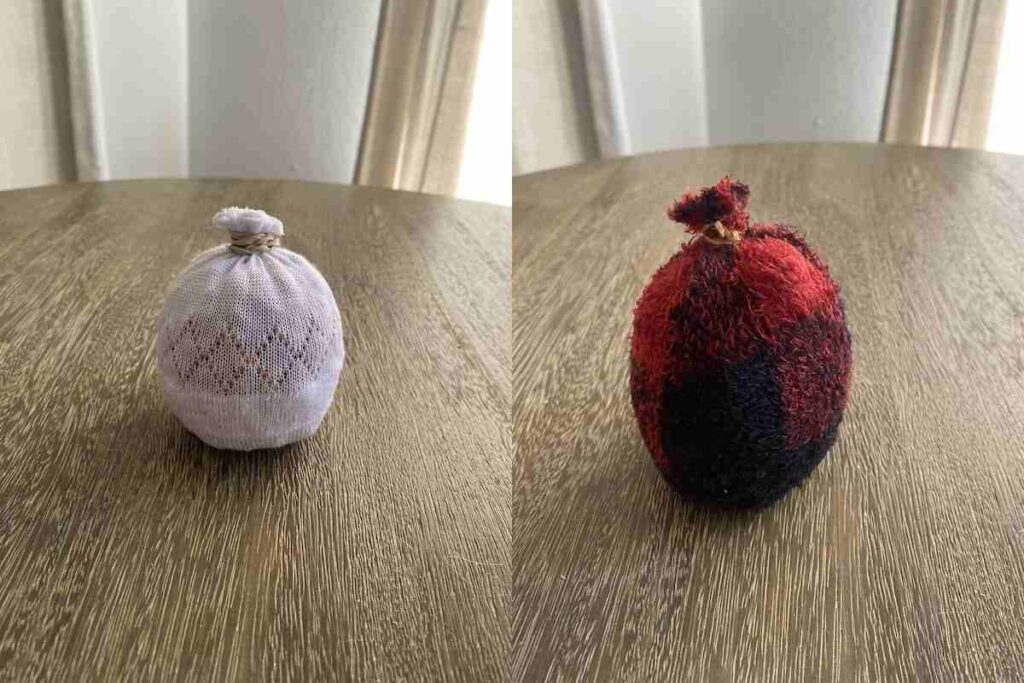
Take the plain tube socks and the beans. You’re going to want to keep filling the sock with beans and pressing them down into the sock by grabbing the top of it in your hand and pushing downward. This will stretch the sock out and allow it to expand into a more round shape.

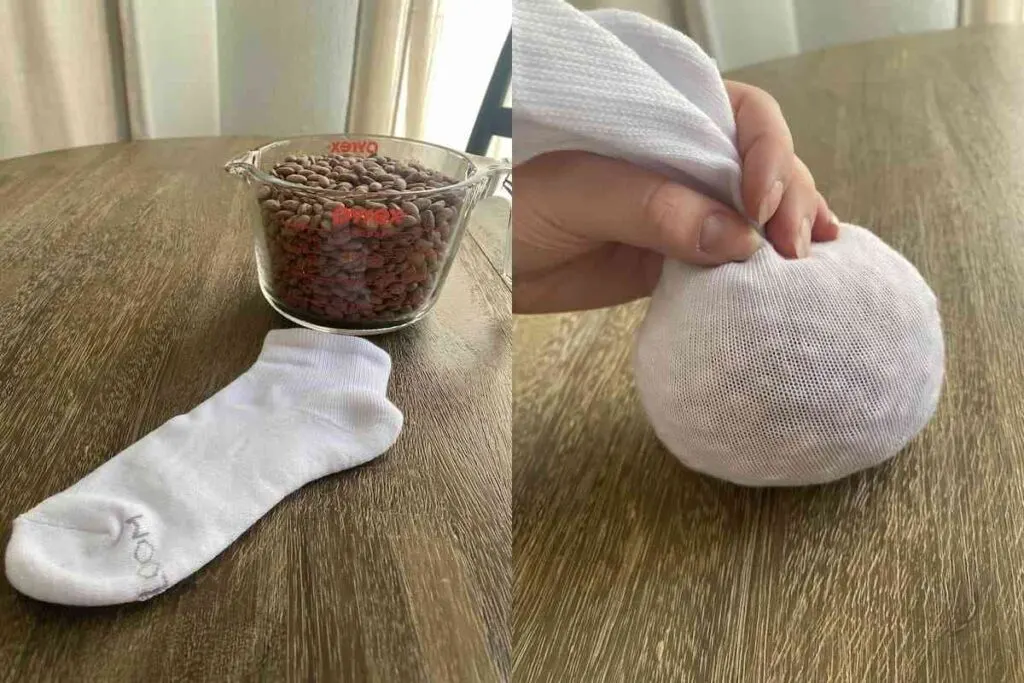
The easiest way to fill the sock is to fill a cup or glass with beans, stretch the opening of the sock over the top of the cup, and turn it upside down. We ended up using about 3 cups of beans for our biggest gnome.
Step 2
Take your rubber band and twist it around the part of the sock that you were previously holding with your hand. Once you’ve twisted this tightly closed, you can use your scissors to cut off the excess fabric of the top of the sock.
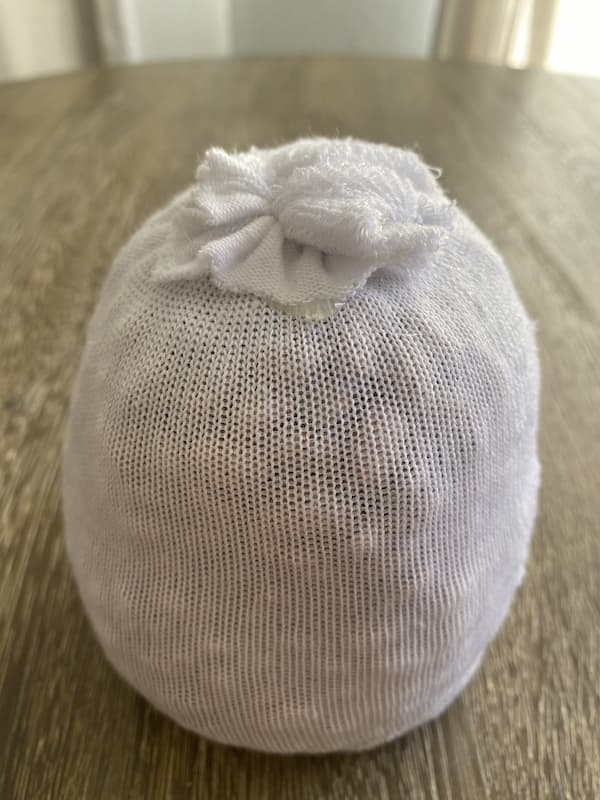

Using your hot glue gun, glue down the small bits of fabric that are left on top of the rubber band so that they lay mostly flat.
Step 3
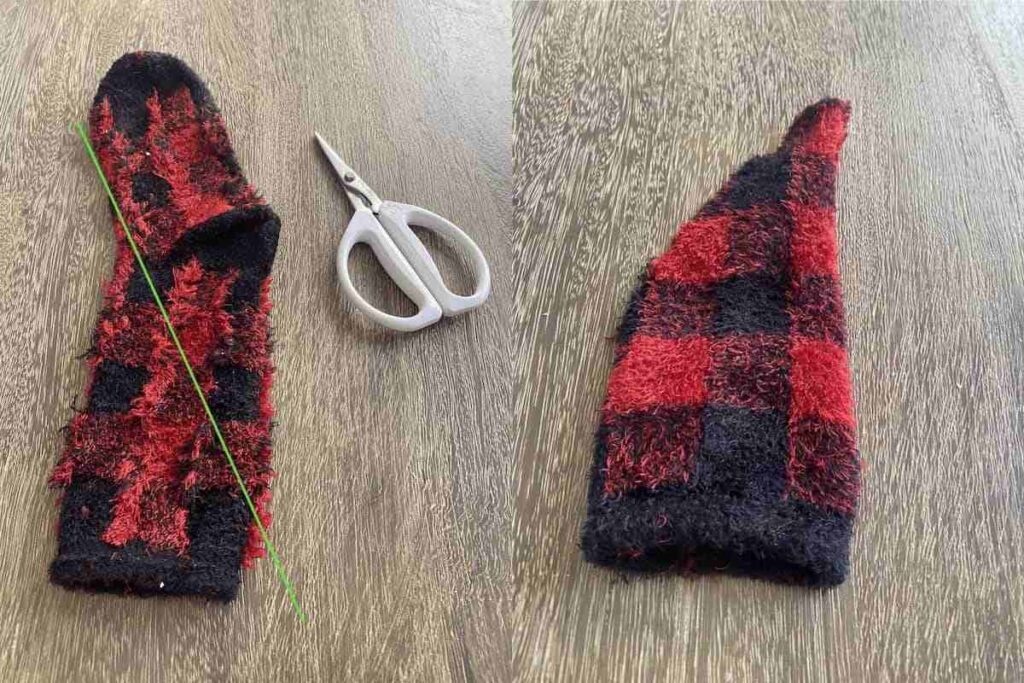
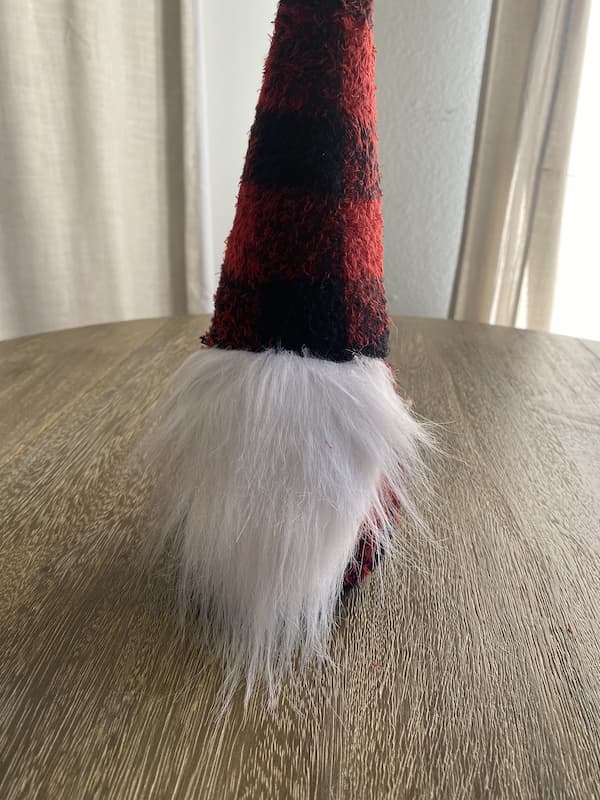
Take your patterned sock and turn it inside out. You’re going to want to cut a sort of half-cone triangle shape, starting from the top open edge of the sock. Cut this shape, then turn the sock right side in.

Step 4
Take the part of the sock you’ve just cut and your styrofoam cone. Stretch the sock over the cone and use your hot glue gun to secure one open edge of it to the cone.
Once this has cooled, repeat the same process with the other edge of the sock, making sure to stretch it closed so that none of the cone is visible before gluing down the fabric.


On the top of the cone, cut most of the excess fabric off, leaving only enough to stretch over the top. Using the hot glue gun, stretch and glue down the fabric to the top of the cone until it is secured.
This doesn’t need to look perfect, as we will be covering this up with a pom-pom at the end.
Step 5
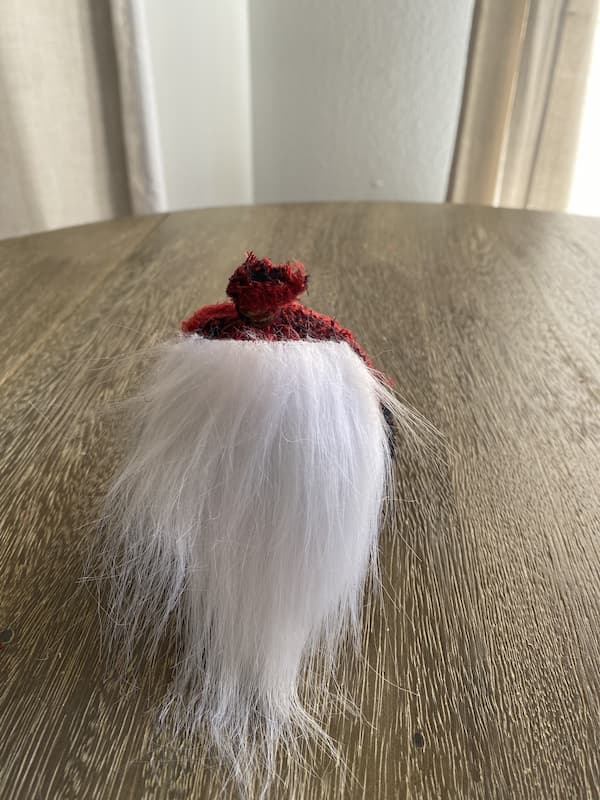
Take your crafting fur, pencil, and scissors. Turn the crafting fur so that the backing is on top, and use your pencil to trace the shape of your beard.
We recommend cutting it a little bit wider than the base of the gnome so that it wraps around slightly. Take your scissors and, before cutting, make sure that they are as close to the backing on the furry side as possible (in other words, make sure that the blade isn’t sitting on top of the fur but underneath it before cutting).
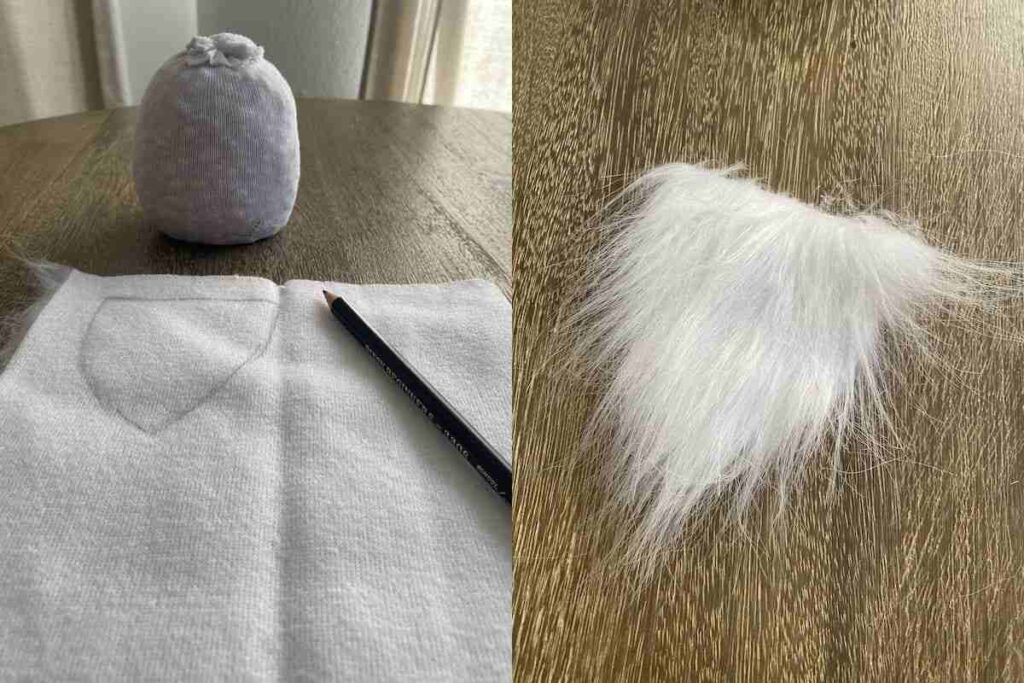
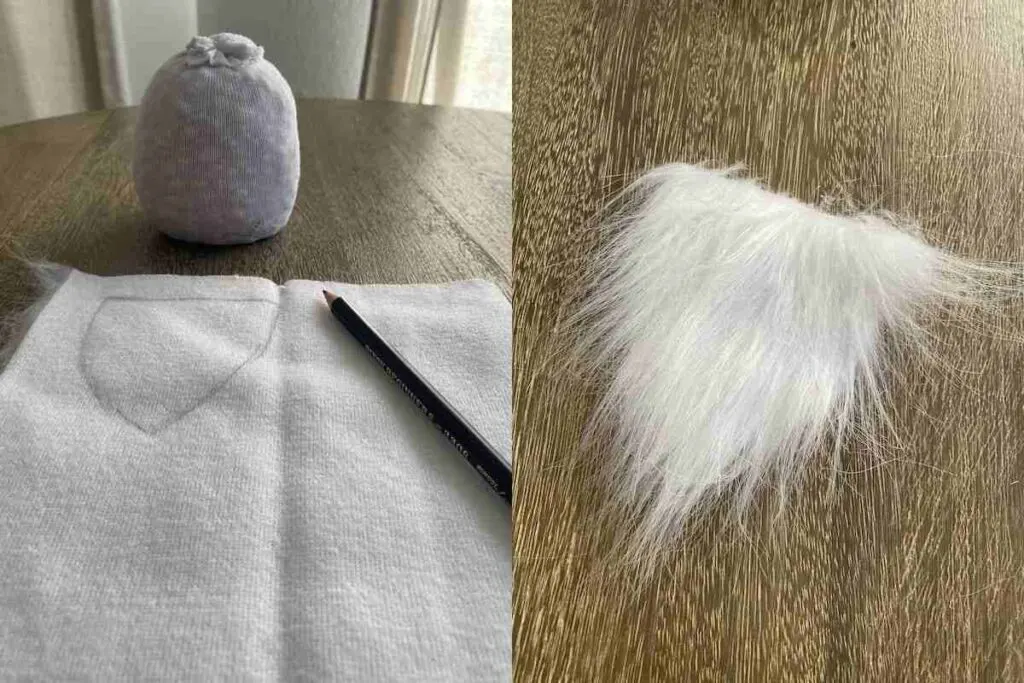
If you cut on top of the fur, it will have blunt, short edges, and will not look like a natural furry beard.
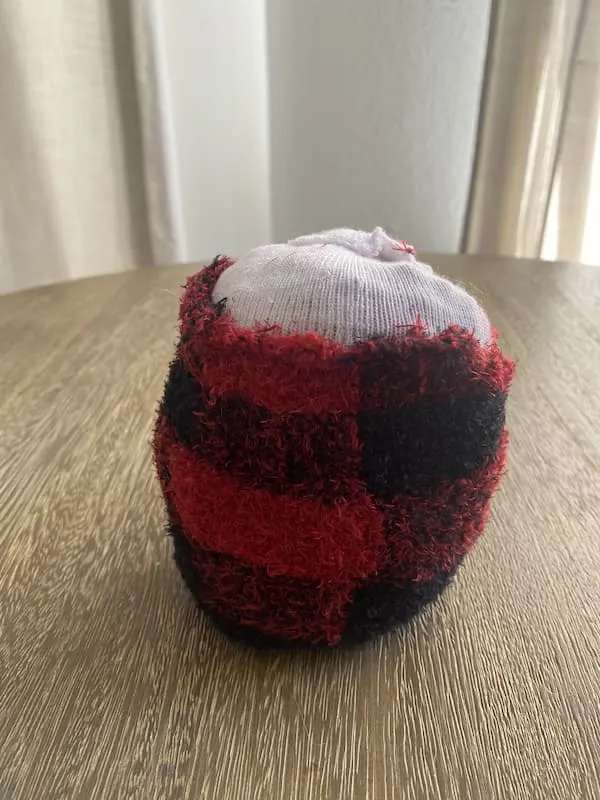
Step 6: (optional)
Because we chose white tube socks, we could see the beans through the sock too much. We decided to take the remaining part of our patterned sock and stretch it over the base of our gnome to cover the white sock, and then stretched and hot glued it into place.

Step 7
Take your furry beard and glue it onto the top of the stuffed base, wherever you prefer the beard to go.

Step 8
Now, we are going to create the pompom for the top of our hat. If you prefer to buy pom poms instead of making them, you may skip this step.
If you’re using yarn to make your pom-pom, you’re going to first take the end of your desired color of yarn and begin wrapping it around three or four of your fingers stuck together. The more yarn you choose to wrap, the fuller and fluffier your pom-pom will be.
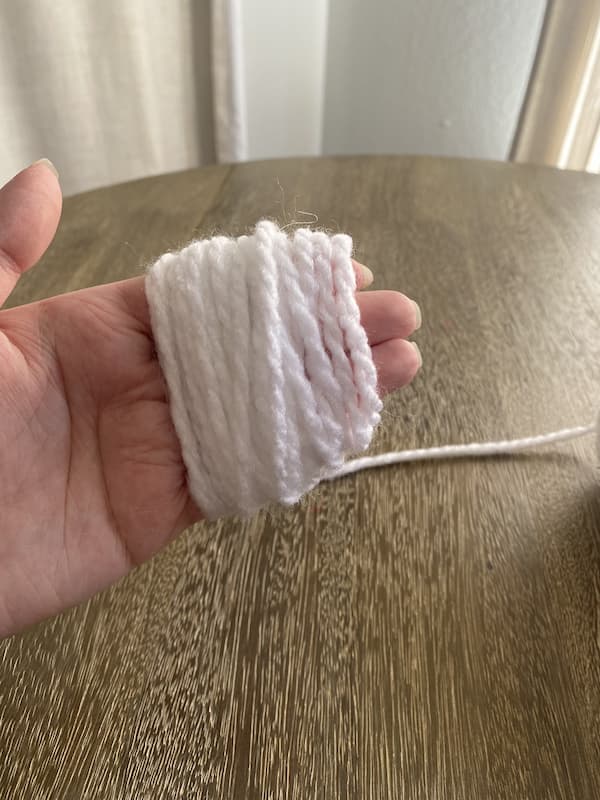
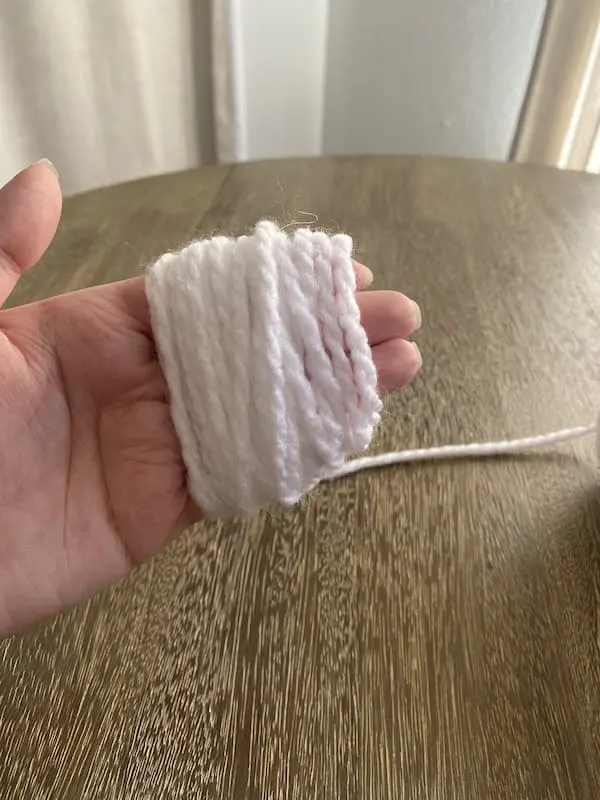
Step 9
Once you’ve wrapped enough yarn around your fingers, cut the end that is attached to your skein of yarn. Cut another piece of yarn, about a foot long. You’re going to use this piece to tie your pom pom together, so you’ll need to put the yarn through your fingers.
Starting near your fingertips, thread one end of the yarn in between your fingertips. Take the other end of the yarn and thread it through the base of your fingers (they are now stuck together because of the yarn, so you may need to use something to help you push the yarn through).
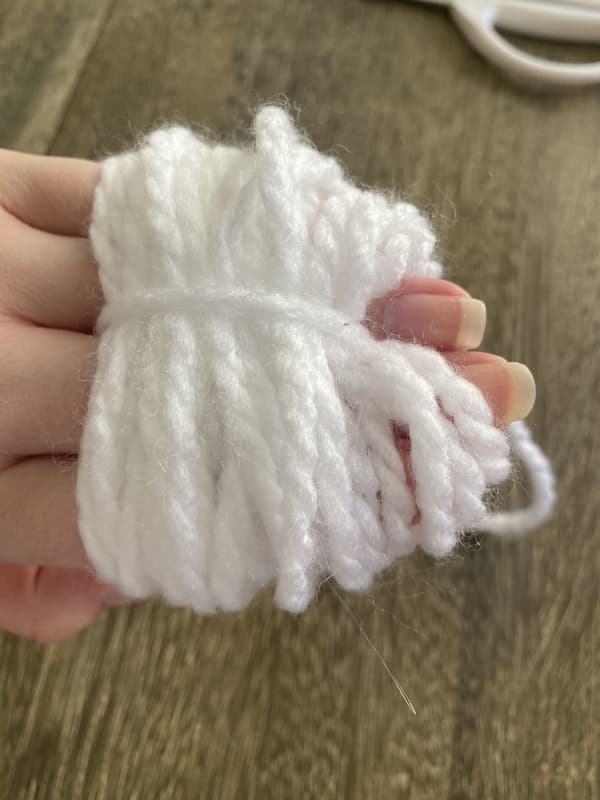

Step 10
Once you’ve done this, tie this piece of yarn so that it is ready to make a knot. Carefully slide the yarn off of your fingers, and tie a tight knot with the piece of yarn you just threaded through.
Tie a couple more knots to secure it.
Step 11
Using your scissors, begin to cut through the loops that you formed when you tied the knot in the yarn. This will form the fluffy ends of your pom pom.
Once you’ve cut through all of the loops, you may cut the pieces that tie the pom pom together to the same length as the other pieces. Use your scissors to cut down the pom pom to your desired size and shape.
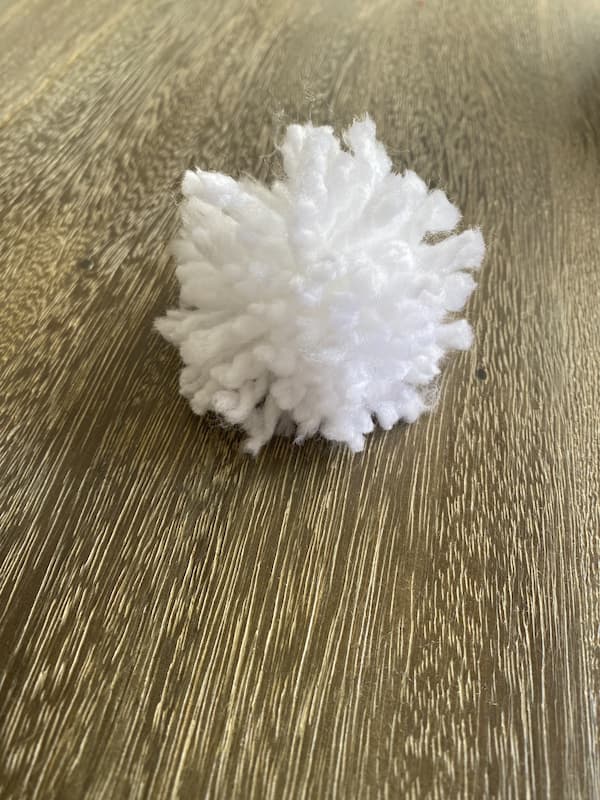

Step 12
Using your hot glue gun, secure your pom pom to the top of the cone hat.


Step 13
Take your wooden doll head or wooden bead and apply hot glue to the back. Place this wherever you would like your gnome’s nose to be.
We placed ours between the top of the beard and the bottom of the hat. This step completes your first gnome!

If you only want to make one type of gnome, then you’re finished. If you want to make a gnome with a yarn beanie, continue on!
Step 14
Repeat steps 1 and 2, making sure to make this one smaller (filling it with fewer beans and using less of the sock). Take your remaining patterned sock and put this small base inside of it, until it reaches the bottom of the sock.
Take your scissors and cut just above where the patterned sock meets the top of the other sock inside of it. Use a rubber band to twist and secure the patterned sock over the tube sock.

Step 15
Repeat step 6, making this beard much smaller than the first one (to match the size of the smaller base you just made). Hot glue this onto your base in the same position that you did the first gnome’s beard in.

Step 16
Take your toilet paper roll (if using a paper towel roll, cut it in half) and flatten it. Taking one end of your yarn, wrap it around the roll longways approximately 30 times.
Use your scissors to cut one end of the yarn that is wrapped around the roll. You should be left with about 30 pieces of yarn that are about 10 inches long each.
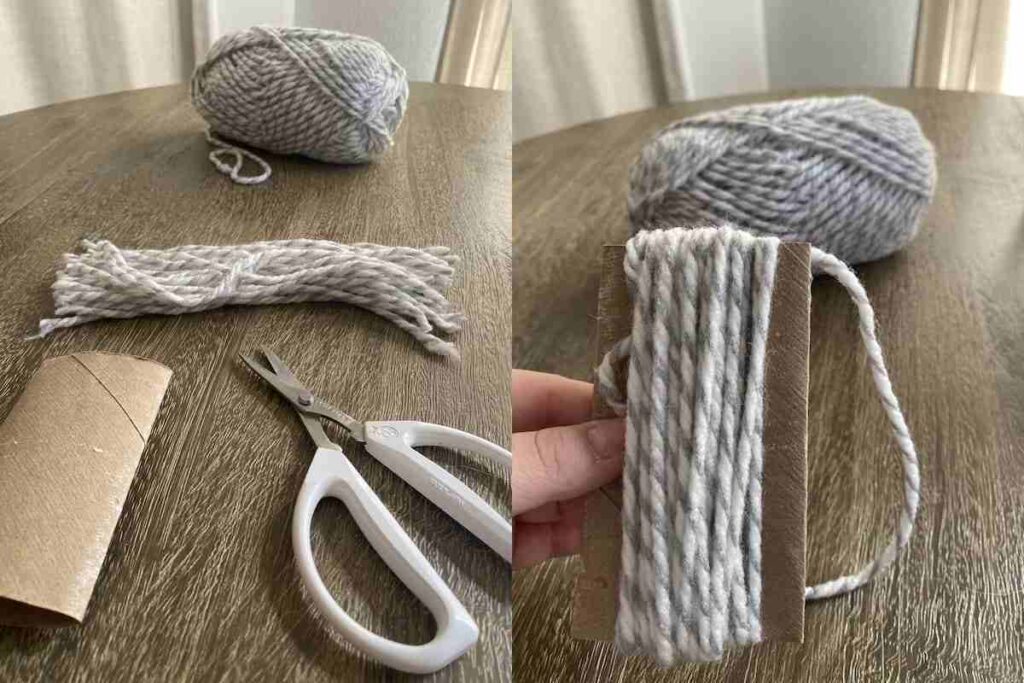

It’s okay for these to be longer or shorter, but keep in mind that it will affect the size of your hat.
Step 17
Take your scissors and cut a ring out of the toiler paper/paper towel roll (it should be about ¼ to ½ inch wide). Pick up a piece of yarn and fold it in half.
Take this piece of folded yarn and thread it part of the way through the middle of the cardboard circle. The top of the folded yarn should make a loop.
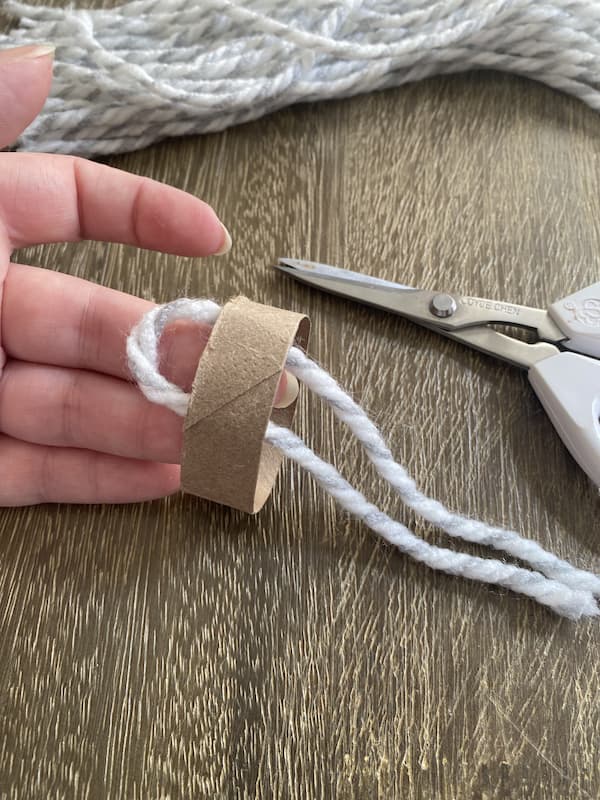

When you’ve gotten this loop into position, take both of the cut ends of the piece of yarn and pull them over and through this loop.


Pull the yarn until it is tight against the cardboard circle.


Repeat this process until all of the pieces of yarn are fastened to the cardboard and the cardboard is completely covered.
Step 18
Cut another piece of yarn, about 10 inches (the length doesn’t matter too much). You’re going to use this to tie off the top of your hat that you’ve just woven.
Take the cardboard with the yarn hanging off of it and straighten out the yarn as much as possible. Take the 10-inch piece of yarn you just cut and lay it on the table.

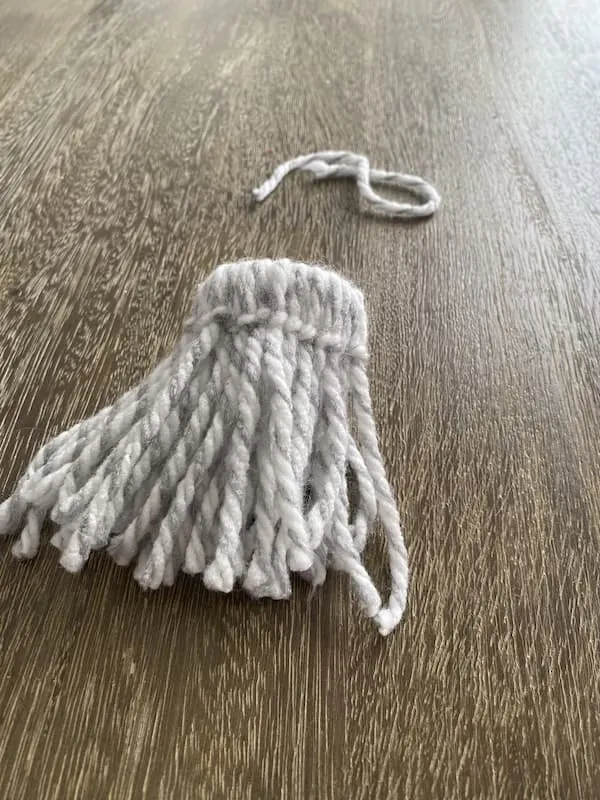
Putting your hat where you want the tie to fit, tie a knot around the top of the hat to close it off. Tie it in another knot to secure it, and cut off the excess parts of this string of yarn.


You should have what resembles a yarn beanie with a pom pom on the top. Use your scissors to shape the pom pom on the top however you like it.
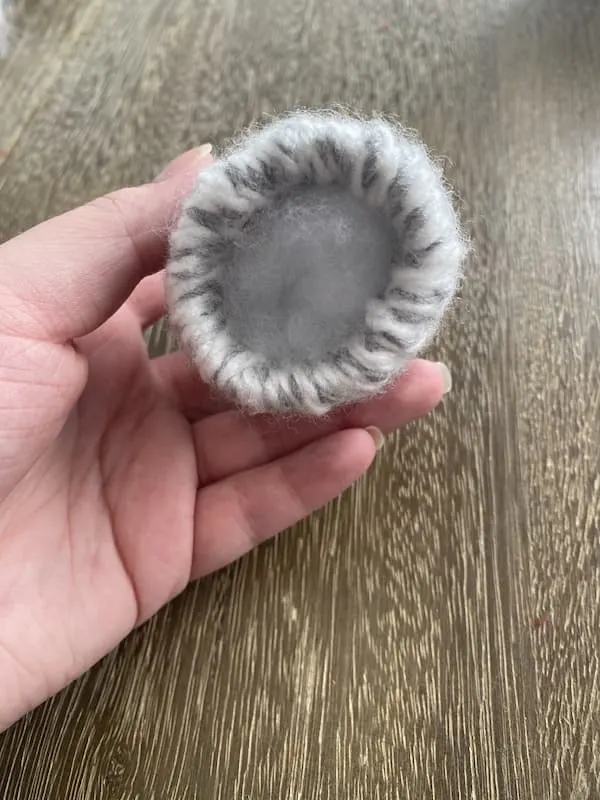
Step 19
In this step, you will stuff your beanie hat. We had leftover pillow stuffing lying around, but if you don’t have this or any other type of lightweight stuffing, you can simply use yarn to stuff your hat. Stuff it so that it is full and round.

Step 20
Take your hot glue gun and glue the beanie to the top of your gnome. Apply hot glue to the back of your wooden doll head and secure it where you would like the nose to be.


This completes your second gnome! Enjoy these festive and whimsical additions to your home. Happy Holidays!

Here are some other Christmas DIY Craft Projects you may enjoy:
- DIY Christmas Cards: Super-Simple Craft Project
- 3 Easy DIY Christmas Craft Ideas With Jar Lids
- Easy DIY Christmas Wreath – with boxwood and holly
Make Your Own Beautiful Living Succulent Wreath Centerpiece! Complete video course by Jeannine Romero now available through Skillshare.